Create a Payment Report
A step-by-step guide to creating and managing a payment report.
Payments Page
Navigate to the Payments page. We go PAY then PAYMENTS.

Payments page
Approved Items Only
Only Crew’s salaries and expenses that have been APPROVED will be showing on the Payments page.
Only items with an APPROVED status can be added to a Payment Report.

Approved items only on the Payments page
Date Picker
Select the date range for your Payment Report using the date picker.
 Date picker
Table Filters
Use the table filters to find relevant items to select and add to your Payment Report. This could be filtering by Board, Job, Payment Type etc.
 Table filters
Selection
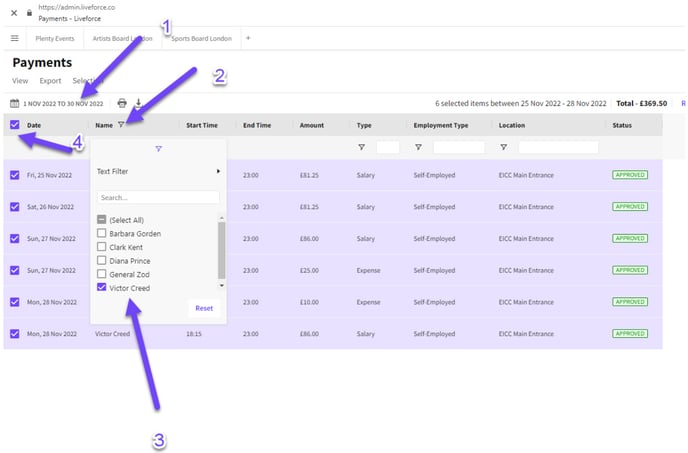
Admin selects which items they want to go into a Payment Report.
Admin selects:
- Last month
- Filters on a Crew name
- Picks name
- Checks all items.
 Admin selects the data for the report
Summary
The number of items, dates and total amounts appears at the top of the report.
The RUN PAYMENT REPORT button also becomes active.
 Summary of items
Run Payment Report
Click the RUN PAYMENT REPORT button and you are shown a summary of who you are paying, what you are paying and how many items. You can if you wish rename the title of the report here.
Also, at this point you can click the button BACK TO PAYMENTS if you see an error.
 Payment report details
Click PROCEED to run the payment report.
A system warning box will appear saying that once you click PROCEED, a Payment Report will be generated, and you will no longer be able to edit the report.
 Warning box
Generating a Payment Report
So if Admin clicks PROCEED a Payment Report is generated.
All the items in the report will now have the status TO BE PAID.
It will show the total amount to be paid, the date range of the items to be paid, when the report was created and by whom.
 Payment Report generated
Exporting the Payment Report
The Payment Report can be exported at this stage to an excel spreadsheet, CSV or zip file. The reports are separated for employed Crew and self-employed Crew. Also a separate report for expenses.
 Export formats
Here are a couple of examples of exported Payment Reports to an Excel spreadsheet. Prior to being sent to payroll for payment. The spreadsheet will have all the information to pay the Crew, bank accounts, sort codes, etc.
The first spreadsheet is for salaries and the second is for expenses which contains a link to any Crew receipts that were uploaded with the items.
 Itemised salary data on spreadsheet
 Expenses spreadsheet with link to receipt
Statuses
So if we look at this item in the Approvals page we can see the status has changed from APPROVED to the status TO BE PAID, highlighted in green.
And if we take a look at the Crew app and their Earnings page. We can see the status has changed from PENDING APPROVAL to APPROVED.
 Statuses in Approvals page and Crew app
Mark as Paid
Once the items in this Payment Report have been paid. Admin will navigate to the Reports page and click on the Payment Report then click the MARK AS PAID button.
 Reports page
 MARK AS PAID button
The status of the report will change to PAID, highlighted in green. Also the date the report was marked as paid and the Admin who marked the report as paid will appear.
 PAID report status
The status of the items in the Reports page and Crew Earnings page of the app will change to PAID in green.